CI/CD for Android and iOS Apps on AWS

CI/CD for Android and iOS Apps on AWS

Mobile apps have taken center stage at Foxintelligence. After implementing CI/CD workflows for Dockerized Microservices, Serverless Functions and Machine Learning models, we needed to automate the release process of our mobile application — Cleanfox — to deliver features we are working on continuously and ensure high quality app. While the CI/CD concepts remains the same, its practicalities are somewhat different. In this post, I will walk you through how we achieved that, including the lessons learned and formed along the way to boost your Android and iOS application development drastically.


The Jenkins cluster (figure below) consists of a dedicated Jenkins master with a couple of slave nodes inside an autoscaling group. However, iOS apps can be built only on macOS machine. We typically use an unused Mac Mini computer located in the office devoted to these tasks.

We have configured the Mac mini to establish a VPN connection (at system startup) to the OpenVPN server deployed on the target VPC.


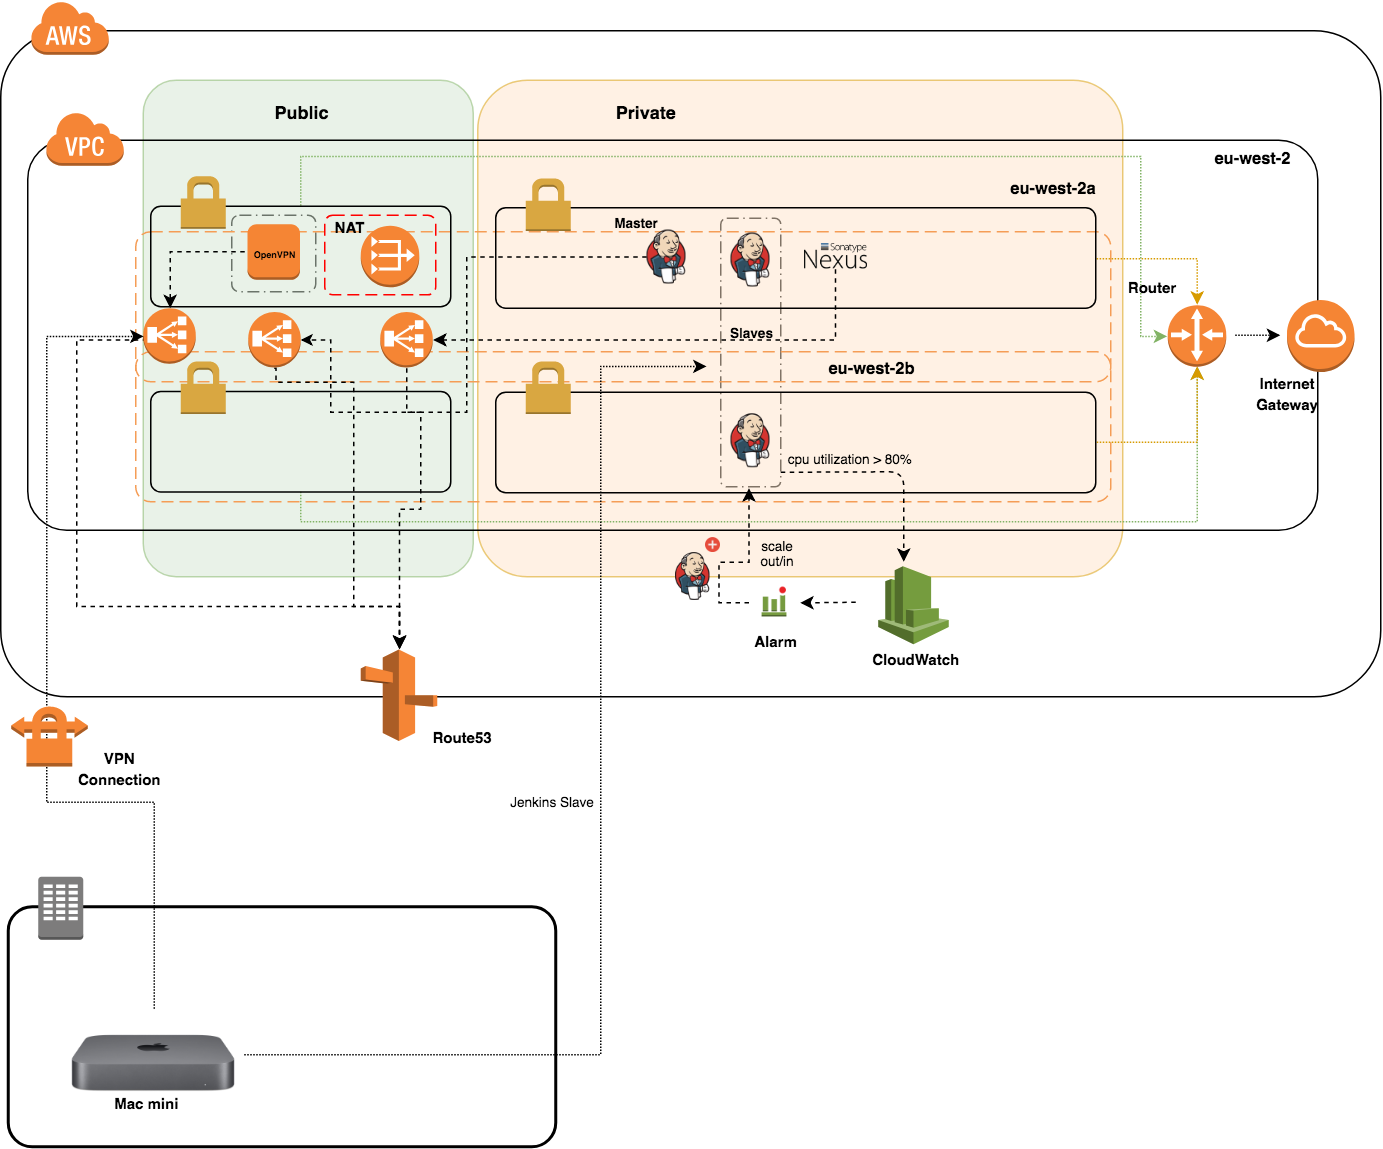
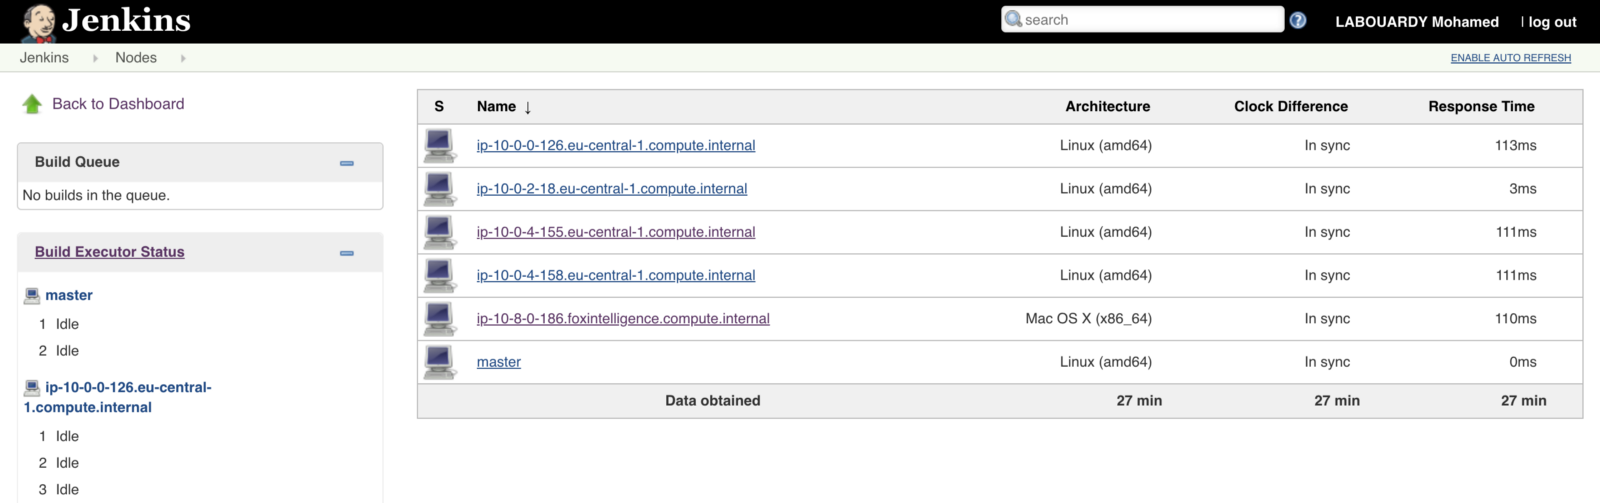
We setup an SSH tunnel to the Mac node using dynamic port forwarding. Once the tunnel is active, you can add the machine to Jenkins set of worker nodes:


This guide assumes you have a fresh install of the latest stable version of Xcode along with Fastlane.

Once we had a good part of this done, we used Fastlane to automate the deployment process. This tool offers a set of scripts written in Ruby to handle tedious tasks such as code signing, managing certificates and releasing ipa to the app store for the end users.

1
2
3
4
5
6
7
8
9
10
11
12
13
14
15
16
17
18
19
20
21
22
23
24
25
26
27
28
29
30
31
32
33
34
35
36
37
38
39
40
41
42
43
44
45
46
47
48
49
50
51
52
53
54
55
56
57
58
59
60
61
62
63
64
65
66
67
68
69
70
71
72
73
74
75
76
77
78
79
default_platform(:ios)

platform :ios do

lane :tests do
scan(
scheme: options[:scheme],
clean: true,
skip_detect_devices: true,
build_for_testing: true,
sdk: 'iphoneos',
should_zip_build_products: true
)
firebase_test_lab_ios_xctest(
gcp_project: 'cleanfox-XXXX',
devices: [
{
ios_model_id: 'ipadmini4',
ios_version_id: '12.0',
locale: 'fr_FR',
orientation: 'portrait'
},
{
ios_model_id: 'iphone7plus',
ios_version_id: '12.0',
locale: 'fr_FR',
orientation: 'portrait'
},
{
ios_model_id: 'iphone8',
ios_version_id: '12.0',
locale: 'fr_FR',
orientation: 'portrait'
},
{
ios_model_id: 'iphonexsmax',
ios_version_id: '12.0',
locale: 'fr_FR',
orientation: 'portrait'
}
]
)
end

lane :increment_build do
version = get_version_number
latestBuildNumber = latest_testflight_build_number(version: version)
increment_build_number(
build_number: latestBuildNumber + 1,
xcodeproj: "Cleanfox.xcodeproj"
)
end

lane :develop do
increment_build
build_app(scheme: "Sandbox",
workspace: "Cleanfox.xcworkspace",
include_bitcode: true)
end

lane :beta do
increment_build
build_app(scheme: "Staging",
workspace: "Cleanfox.xcworkspace",
include_bitcode: true)
upload_to_testflight
end

lane :prod_testflight do
increment_build_number(
build_number: latest_testflight_build_number + 1,
xcodeproj: "Cleanfox.xcodeproj"
)
build_app(scheme: "Production",
workspace: "Cleanfox.xcworkspace",
include_bitcode: true)
upload_to_testflight(skip_waiting_for_build_processing: true)
end
end

Also, we created a Jenkinsfile, which defines a set of steps (each step calls a certain actions — lane — defined in the above Fastfile) that will be executed on Jenkins based on the branch name (GitFlow model):

1
2
3
4
5
6
7
8
9
10
11
12
13
14
15
16
17
18
19
20
21
22
23
24
25
26
27
28
29
30
31
32
33
34
35
36
37
38
39
40
41
42
43
44
45
46
47
48
49
50
51
52
53
54
55
56
57
58
59
60
61
62
63
64
65
66
67
68
69
70
71
72
73
74
75
76
77
78
79
80
81
82
83
84
85
86
87
88
89
90
91
92
93
94
95
def bucket = 'mobile-artifacts-foxintelligence'

node('mac') {
try {
stage('Checkout') {
checkout scm
notifySlack('STARTED')
}

stage('Install Dependencies') {
sh "pod install"
}

stage('Build') {
if (env.BRANCH_NAME == 'master'){
sh "bundle exec fastlane prod_testflight"
}
if (env.BRANCH_NAME == 'preprod'){
sh "bundle exec fastlane staging"
}
if (env.BRANCH_NAME == 'develop'){
sh "bundle exec fastlane develop"
}
}

stage('Push') {
sh "aws s3 cp Cleanfox.ipa s3://${bucket}/ios/cleanfox-${commitID()}.ipa"

if (env.BRANCH_NAME == 'master'){
sh "aws s3 cp Cleanfox.ipa s3://${bucket}/ios/cleanfox-latest.ipa"
}
if (env.BRANCH_NAME == 'preprod'){
sh "aws s3 cp Cleanfox.ipa s3://${bucket}/ios/cleanfox-preprod.ipa"
}
if (env.BRANCH_NAME == 'develop'){
sh "aws s3 cp Cleanfox.ipa s3://${bucket}/ios/cleanfox-develop.ipa"
}
}

stage('Test') {
if (env.BRANCH_NAME == 'master'){
sh 'bundle fastlane tests --scheme "Production"'
}
if (env.BRANCH_NAME == 'preprod'){
sh 'bundle fastlane tests --scheme "Staging"'
}
if (env.BRANCH_NAME == 'develop'){
sh 'bundle fastlane tests --scheme "Sandbox"'
}
}
}catch(e){
currentBuild.result = 'FAILED'
throw e
}finally{
notifySlack(currentBuild.result)
}
}

def notifySlack(String buildStatus){
buildStatus = buildStatus ?: 'SUCCESSFUL'
def colorCode = '#FF0000'
def subject = "Name: '${env.JOB_NAME}'\nStatus: ${buildStatus}\nBuild ID: ${env.BUILD_NUMBER}"
def summary = "${subject}\nMessage: ${commitMessage()}\nAuthor: ${commitAuthor()}\nURL: ${env.BUILD_URL}"

if (buildStatus == 'STARTED') {
colorCode = '#546e7a'
} else if (buildStatus == 'SUCCESSFUL') {
colorCode = '#2e7d32'
} else {
colorCode = '#c62828c'
}

slackSend (color: colorCode, message: summary)
}

def commitAuthor(){
sh 'git show -s --pretty=%an > .git/commitAuthor'
def commitAuthor = readFile('.git/commitAuthor').trim()
sh 'rm .git/commitAuthor'
commitAuthor
}

def commitID() {
sh 'git rev-parse HEAD > .git/commitID'
def commitID = readFile('.git/commitID').trim()
sh 'rm .git/commitID'
commitID
}

def commitMessage() {
sh 'git log --format=%B -n 1 HEAD > .git/commitMessage'
def commitMessage = readFile('.git/commitMessage').trim()
sh 'rm .git/commitMessage'
commitMessage
}

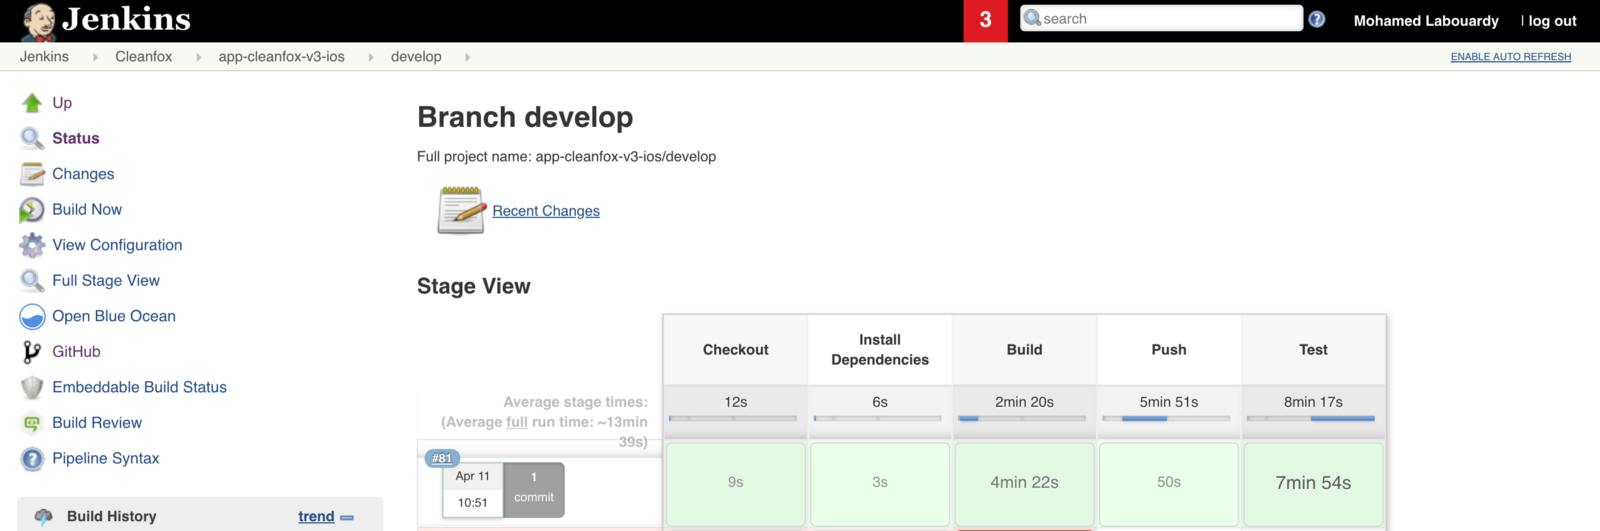
The pipeline is divided into 5 stages:

  • Checkout: clone the GitHub repository.
  • Quality & Unit Tests: check whether our code is well formatted and follows Swift best practices and run unit tests.
  • Build: build and sign the app.
  • Push: store the deployment package (.ipa file) to an S3 bucket.
  • UI Test: launch UI tests on Firebase Test Lab across a wide variety of devices and device configurations.

If a build on the CI passes, a Slack notification will be sent (broken build will notify developers to investigate immediately).

Note the usage of the git commit ID as a name for the deployment package to give a meaningful and significant name for each release and be able to roll back to a specific commit if things go wrong.

Once the pipeline is triggered, a new build should be created as follows:


At the end, Jenkins will launch UI Tests based on XCTest framework on Firebase Test Lab across multiple virtual and physical devices and different screen sizes.


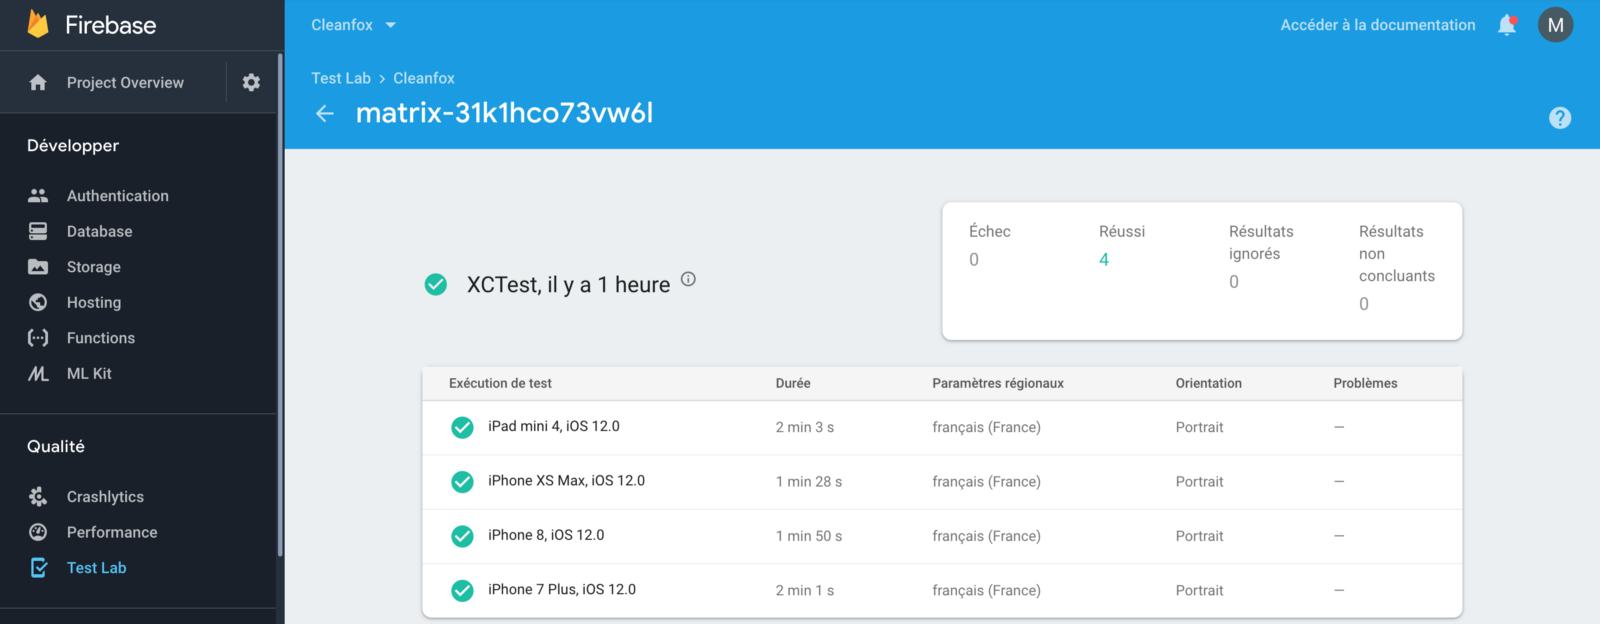
We gave a try to AWS Device Farm, but we needed to get over 2 problems at the same time. We sought waiting for a very short time, to receive tests result, without paying too much.

Test Lab exercises your app on devices installed and running in a Google data center. After your tests finish, you can see the results including logs, videos and screenshots in the Firebase console.


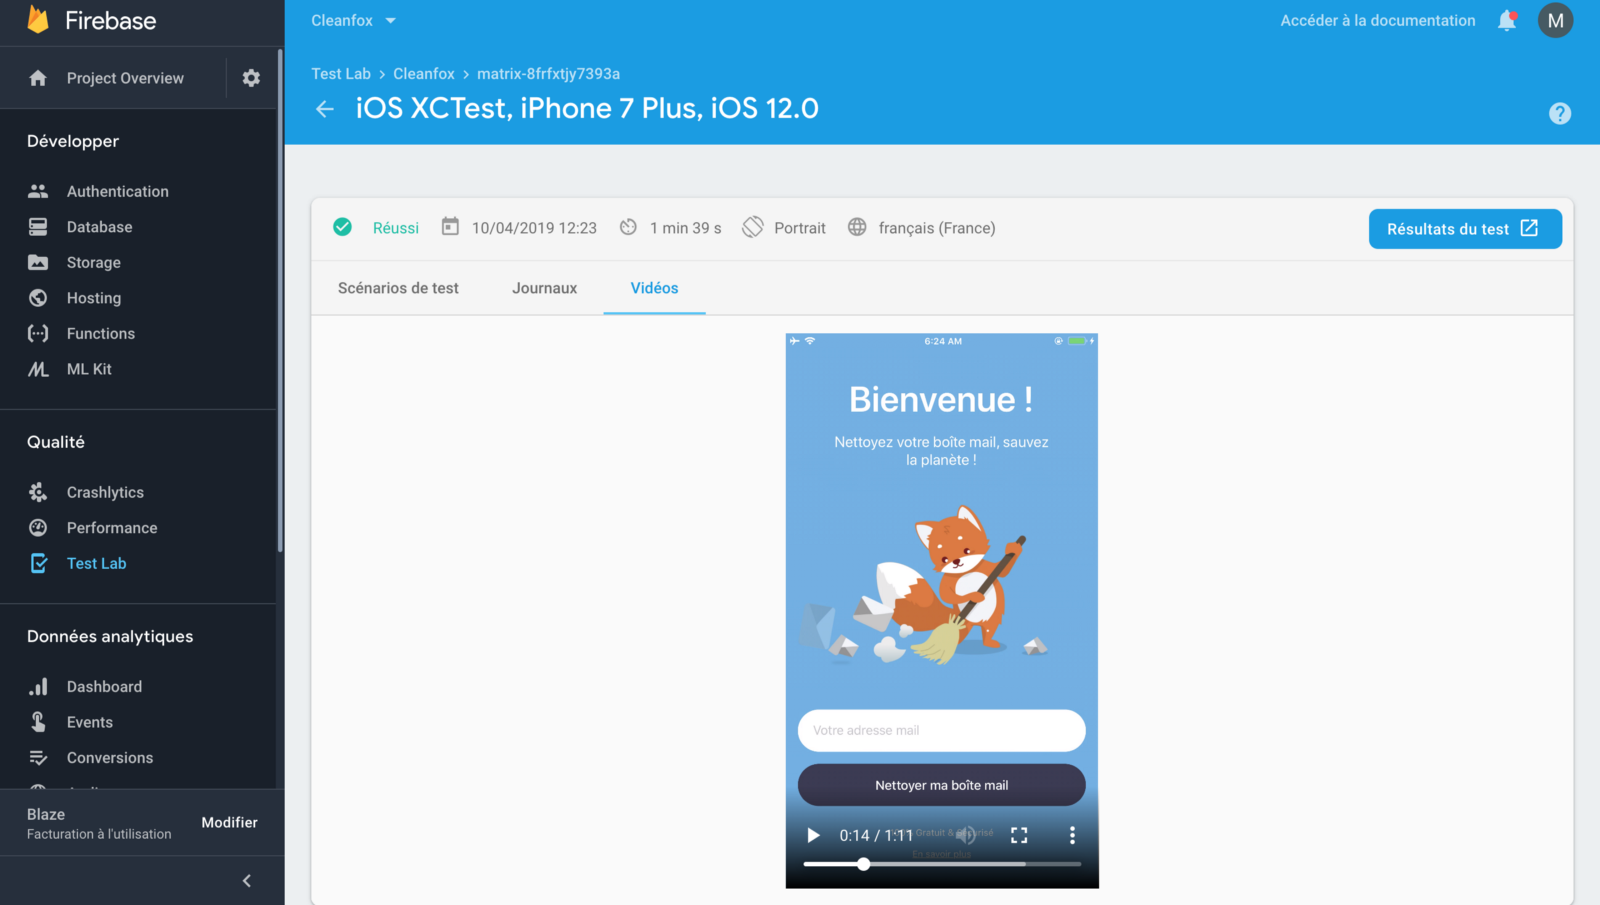
You can enhance the workflow to automate taking screenshots through fastlane snapshot command and saves hours of valuable time you’ll burn taking screenshots. To upload the screenshots, metadata and the IPA file to iTunes Connect, you can use deliver command, which is already installed and initialized as part of fastlane.

The Android CI/CD workflow is quite straightforward, as it needs only the JDK environment with Android SDK preinstalled, we are running the CI on a Jenkins slave deployed into an EC2 Spot instance. The pipeline contains the following stages:

1
2
3
4
5
6
7
8
9
10
11
12
13
14
15
16
17
18
19
20
21
22
23
24
25
26
27
28
29
30
31
32
33
34
35
36
37
38
39
40
41
42
43
44
45
46
47
48
49
50
51
52
53
54
55
56
57
58
59
60
61
62
63
64
65
def bucket = 'mobile-artifacts-foxintelligence'

node('android') {
try {
stage('Checkout') {
checkout scm
notifySlack('STARTED')
}

stage('Clean & Prepare') {
sh "./gradlew clean"
}

stage('Quality Tests') {
sh "./gradlew lintDebug"
androidLint pattern: 'app/build/reports/lint-results-debug.xml'
}

stage('Unit Tests') {
sh "./gradlew testDebug --stacktrace"

if (env.BRANCH_NAME == 'master'){
sh "./gradlew testReleaseUnitTest"
}
if (env.BRANCH_NAME == 'preprod'){
sh "./gradlew testStagingUnitTest"
}
if (env.BRANCH_NAME == 'develop'){
sh "./gradlew testSandboxUnitTest"
}

publishHTML([reportDir: 'app/build/reports/tests/testDebugUnitTest', reportFiles: 'index.html', reportName: 'Unit Tests Report'])

junit 'app/build/test-results/testDebugUnitTest/*.xml'
}

stage('Build'){
sh "./gradlew assembleDebug"

if (env.BRANCH_NAME == 'master'){
sh "./gradlew compileReleaseKotlin"
}
if (env.BRANCH_NAME == 'preprod'){
sh "./gradlew compileStagingKotlin"
}
if (env.BRANCH_NAME == 'develop'){
sh "./gradlew compileSandboxKotlin"
}
}

stage('Push'){
sh "aws s3 cp app/build/outputs/apk/debug/app-debug.apk s3://${bucket}/android/${commitID()}.apk"
}

stage('UI Tests'){
sh "./gradlew assembleDebugAndroidTest"
sh "gcloud firebase test android run --app app/build/outputs/apk/debug/app-debug.apk --test app/build/outputs/apk/androidTest/debug/app-debug-androidTest.apk"
}
}catch(e){
currentBuild.result = 'FAILED'
throw e
}finally{
notifySlack(currentBuild.result)
}
}

The pipeline could be drawn up as the following steps:

  • Check out the working branch from a remote repository.
  • Run the code through lint to find poorly structured code that might impact the reliability, efficiency and make the code harder to maintain. The linter will produces XML files which will be parsed by the Android Lint Plugin.
  • Launch Unit Tests. The JUnit plugin provides a publisher that consumes XML test reports generated and provides some graphical visualization of the historical test results as well as a web UI for viewing test reports, tracking failures, and so on.


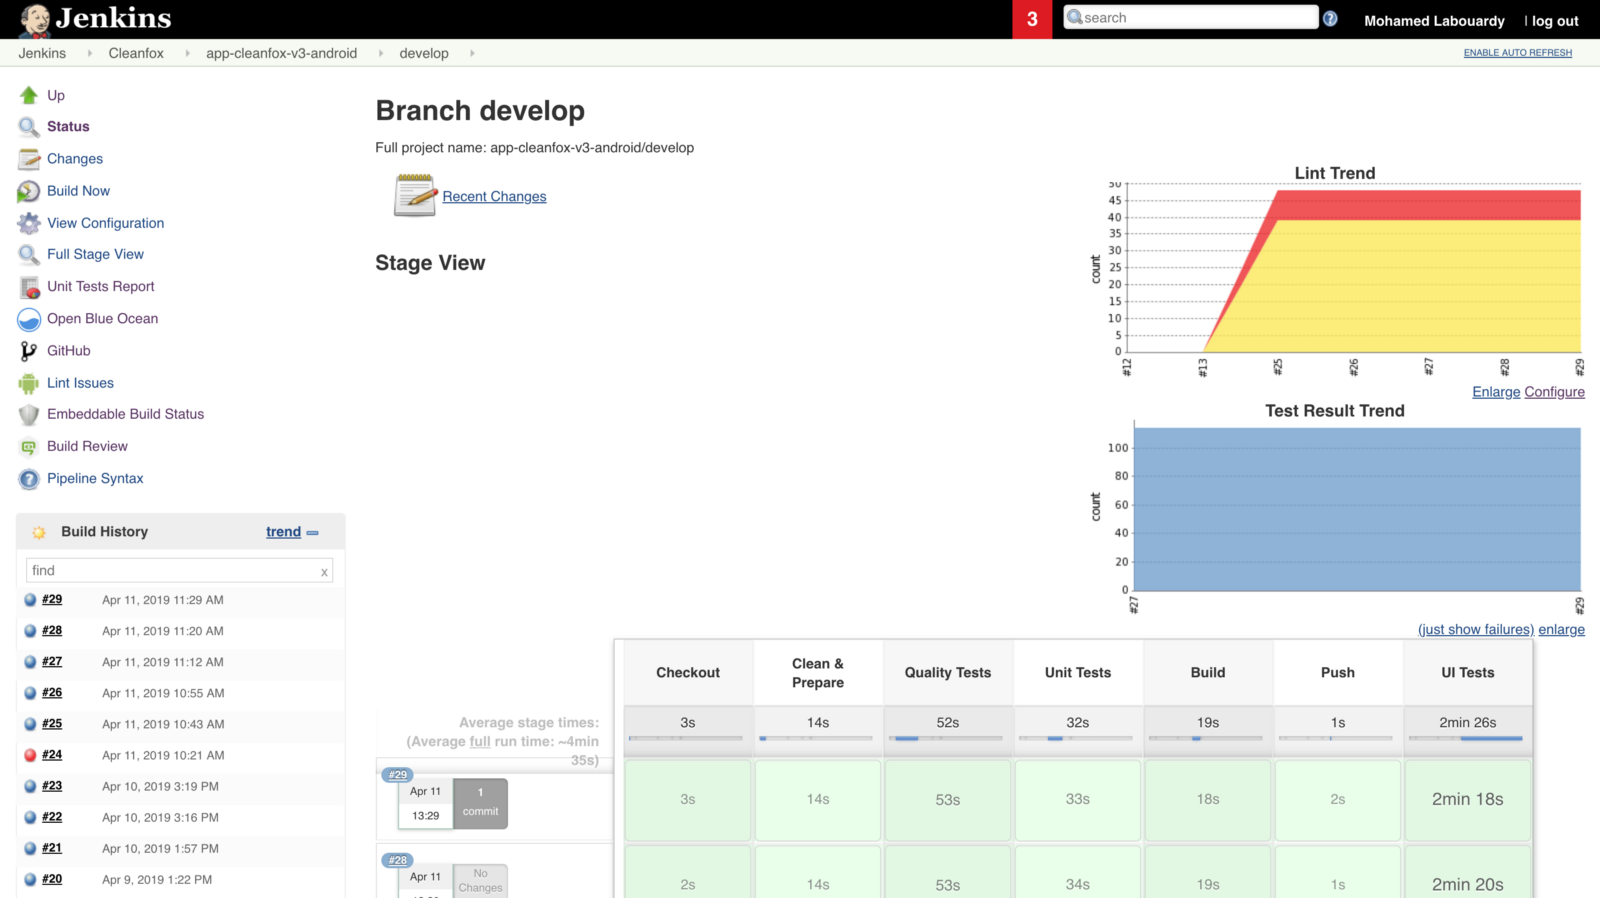
  • Build debug or release APK based on the current Git branch name.
  • Upload the artifact to an S3 bucket.
  • Similarly, after the instrumentation tests have finished running, the Firebase web UI will then display the results of each test — in addition to information such as a video recording of the test run, the full Logcat, and screenshots taken:


To bring down testing time (and reduce the cost), we are testing Flank to split the test suite into multiple parts and execute them in parallel across multiple devices.

Our Continuous Integration workflow is sailing now. So far we’ve found that this process strikes the right balance. It automates the repetitive aspects, provides protection but is still lightweight and flexible. The last thing we want is the ability to ship at any time. We have an additional stage to upload the iOS artifact to Test Flight for distribution to our awesome beta tests.

Like what you’re read­ing? Check out my book and learn how to build, secure, deploy and manage production-ready Serverless applications in Golang with AWS Lambda.

Drop your comments, feedback, or suggestions below — or connect with me directly on Twitter @mlabouardy.

Comments

Your browser is out-of-date!

Update your browser to view this website correctly. Update my browser now

×